VMware vSphere 8.0 U2 and federated Authentications with Microsoft Entra ID
- Edwin de Bruin
- 30 dec 2023
- 6 minuten om te lezen

Bijgewerkt op: 29 jun 2024
A new feature available since vSphere 8.0 U2 is federated authentication with Microsoft Entra ID (Azure Active Directory) and provision the users with SCIM. This is really nice since it is now possible to create Single Sign On, leverage Conditional Access policies and Multi Factor Authentication (MFA).

In this blog I will explain step by step how to configure this and how to mitigate a in my opinion big fat no no required in the original documentation: Expose vCenter to the public....
Chapter 1 setup the federation
Tab on the "bars" next to vSphere Client
Click on Administration

Click on Configuration
Click on Change Provider
Click on Azure AD

Click on "Run Prechecks"

Mark the checkbox "I confirm that prerequisites are met and acknowledge all warnings.

Enter a Directory name and the Domain Name (as used in Entra ID), hit the "+" button. Click on Next.

Adjust or hit next in the following screen:

Type in a IDP name, I used "EntraID" but this is up to you.
Copy the Redirect URI by clicking on the copy button, this is needed further on.

Switch to your Microsoft Azure portal and open App registrations, click on "+ New registration".

Enter a Name
Switch to "Web"
Paste the redirect URI you copied earlier.
Click register.

Copy the Application (client) ID, click on the copy button.

Switch back to vCenter and copy the ClientID in the "Client Identifier" field.

Switch to the Azure Portal Again, click on "Certificates & secrets".

Click on "New client secret".

Enter a Description
Hit "add"

Copy the " value" of the new secret by clicking on the copy button

Switch back to vCenter and paste the copied " value" in the " shared secret" field

Switch back to Azure Portal
Click on "Overview"
Click on "Endpoints"

Copy the value of the "OpenID Connect metadata document" by clicking the copy button.

Switch back to vCenter and paste the value to the OpenID Address

At the bottom click " Next"

and the following screen click "Finish".

You will see the following screen.

Keep this screen open.
Chapter 2 setup the user provisioning.
In this chapter we are going to configure the user provisioning. There is no other way than provision the users by using SCIM from Entra ID to vCenter.
Switch to the Azure Portal again, open "Enterprise applications" and click on "+ New Application".

This part is deviating from the VMware documentation. We are going to use the On-premises SCIM app. By using this we don't need to exposure the vCenter on the internet or setup tunnels but are going to use an on-premises agent. So instead selecting the "VMware Identity Service" search for the " On-premises SCIM app"
type in "on premise".
Select the "On-premises SCIM app".

Enter a name
Click Create

Click on "provisioning"
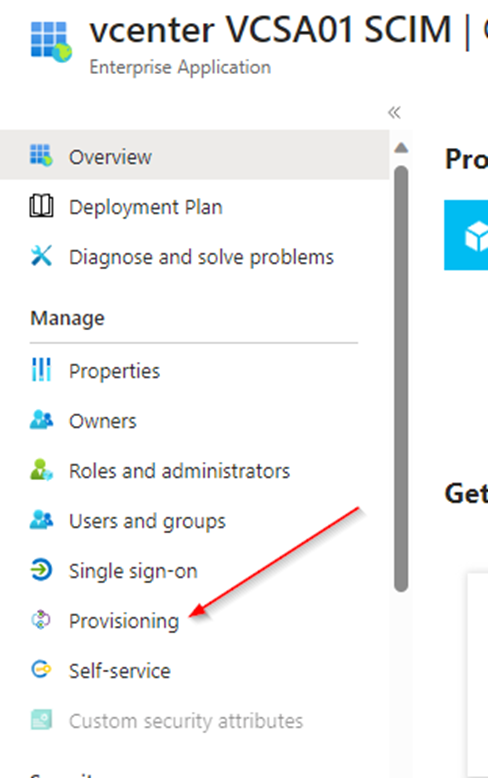
Click on "provisioning" again.

Switch "Provisioning mode to "Automatic".

You can download the needed on-premises agent under "On-Premises Connectivity". Click on " download and install

Click on "Accept terms & Download".

Now I decided to install this agent on the same server running my Entra Connect. This is not a requirement; you can install this on any server you wish but this server must be able to reach vCenter.
Copy the downloaded agent to the server

Double click on the installer, agree terms and click on "Install".

Click next in the Welcome screen

Select "on-premises application provisioning (Microsoft Entra ID to application).

Connect to Microsoft Entra ID.

Click Confirm

When installed successfully click on " Close".

A requirement is that the agent trusts the vCenter certificate. Connection will fail if the agent does not trust the certificate of the vCenter server. If you still use the default self-signed certificate as I do (I know, it's my HomeLab.) import the certificate of the vCenter to the "Trusted Root Certification Authorities" on the machine where you install the agent.
Back to the Azure Portal:
Click on the "arrow" below "Agents".
and select your newly installed agent.

Click on Assign Agent.

Now you can wait 10 minutes or restart the provisioning agent if your impatient (I am)

Ok, so switch back to vCenter page. Copy the tenant URL below "User Provisioning" by clicking the copy button.

In the Azure portal tab past this URL in the Tenant URL

In the vCenter window generate a Secret Token by clicking the "Generate" button

Copy the token by clicking the copy button.

Paste this token in the Azure tab in the Secret Token field.

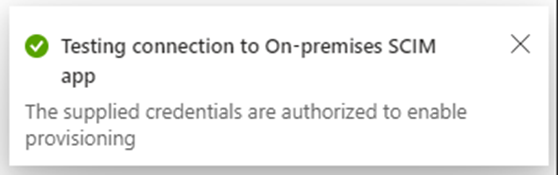
the moment of truth... click "Test Connection".

You are awesome, made sure the vCenter certificate is trusted, off course it works!
Now hit Save

Chapter 3 mapping the user attributes
Since we are provisioning Entra ID users to vCenter we need to map some of the Entra ID attributes to the attributes vCenter understands.
Open Mappings
Click on "Provision Azure Active Directory Users"

Clean up the attributes so only the following attributes remain: UserName, active, name.givenName, name.FamilyName, externalid:

Next,
enable "Show advanced options".
Click on "Edit attribute list for AgentBasedScim".

Scroll to the last line and the following line as string:
urn:ietf:params:scim:schemas:extension:ws1b:2.0:User:domain 
Hit Save

Click on "mailnickname"

Change source attribute to "objectid"
Match objects using this attribute to "Yes"
click OK

Click on "UserPrincipalName"

We need to break up the UPN of the EntraID attribute and extract the username part.
Change " Mapping type" to " Expression"
2. In the "Expression Field" type in the following value:
Item(Split([userPrincipalName], "@"), 1)3. Change Match objects using this attribute to "No"
4. Click "Ok"

Another change has to be made to the "externalid" attribute; we can do this now because we removed the "match objects using this attribute" in the previous step of the userName attribute.
Click on "objectid"

Mind the source attribute. Little bug, this might switch back to default. Make sure this is still "objectid"
Change "matching precedence" to "1"
click "OK".
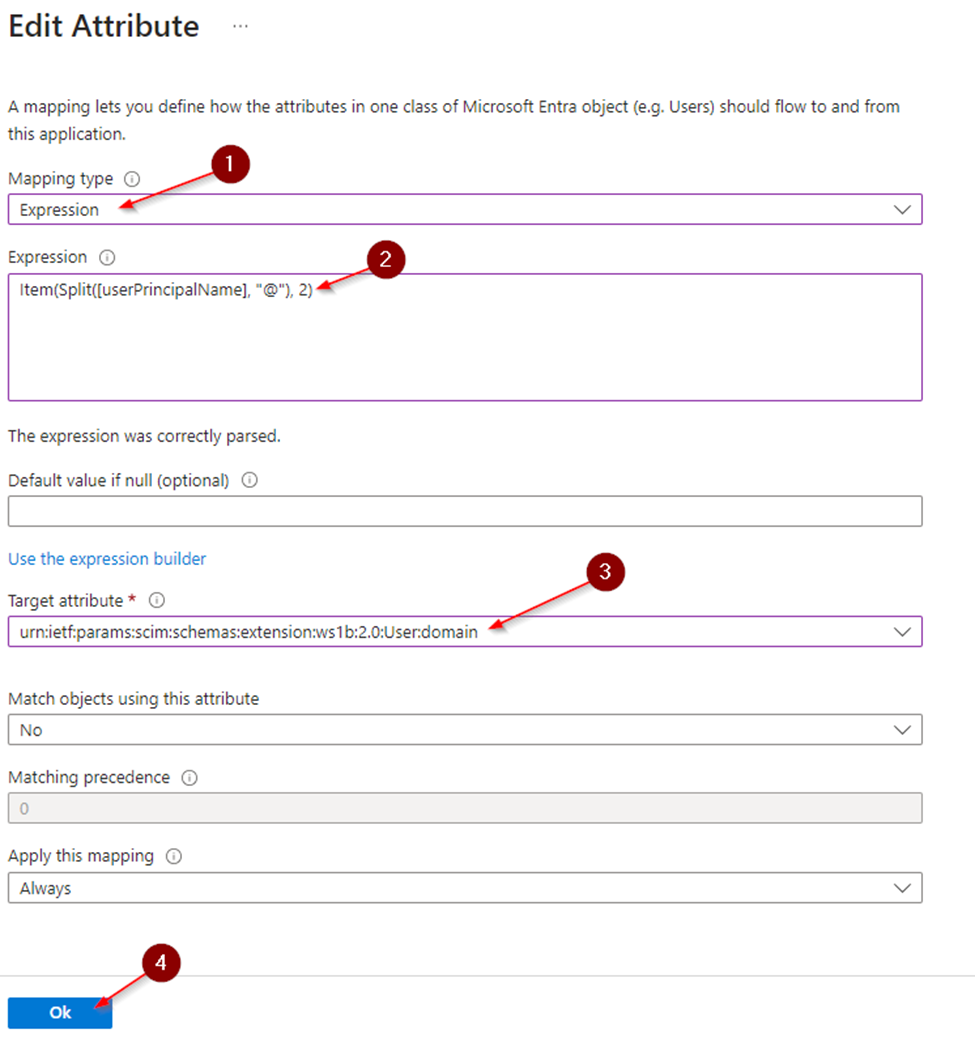
Click on "add New Mapping:

This time we need to extract the domain part of the UPN
Change " Mapping type" to " Expression"
2. In the "Expression Field" type in the following value:
Item(Split([userPrincipalName], "@"), 2)3. Change the target attribute to "urn:ietf:params:scim:schemas:extension:ws1b:2.0:User:domain
4. Click OK.
The attributes Mappings should look like this now:

2. Click Save
Next,
Enable Provisioning Status
Hit "Save"

Chapter 4 Provision and Assign the users to the Apps
In the On-premises SCIM app
Click on " Users and Groups"
Click on " + Add user/group"

Click on "none selected" below "Users and groups".
Search a user.
Select the user.
Click on "Select"

Hit "Assign"

We are going to test the provisioning now,
Click "Provision on demand"
Select the user you want to provision.
Hit "Provision"

And see the magic happen, the user is getting provisioned.

In vCenter, when you go to "Users and Groups", select your Domain and voila the user is created!

The user is there but has no actual rights in vCenter. let's assign this:
Click on Global Permissions
Click on Add

assign the rights:
Select your domain.
Select the user.
Select the Role.
Propagate to children.
Click OK.

One last thing we need to do now in the Azure Portal; assign the user to the vCenter VCSA01 OPENID app:
In the portal open Enterprise Applications and select the OpenID app
Click on Users and groups.
click on "+ Add user/group".

Add the assignment:
Click on "None Selected"
Find the user.
select the user.
Click "Select"
Click on "Assign"

Chapter 5 To the test track!
I suggest opening an "in private" window in your browser, enter your vCenter URL and hit the "Sign In" Button.
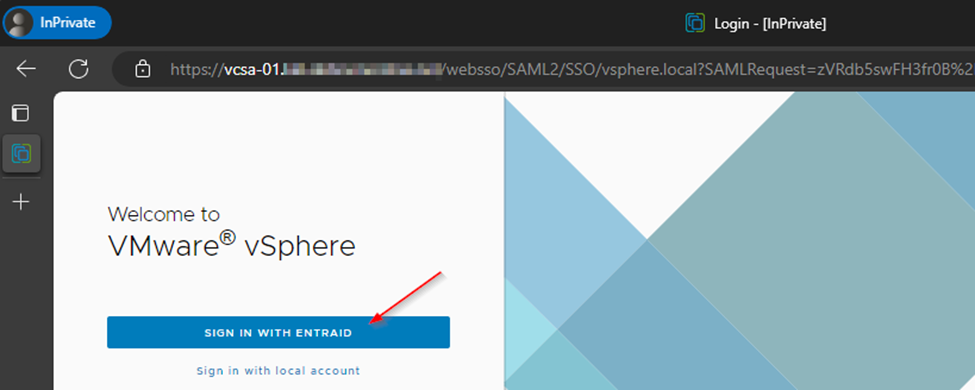
You will be redirected to the Entra ID tenant

Sign In with or without MFA accordingly to your Conditional access policies:

Select the Consent and click "Accept".

and you are in!

Chapter 6 The Conclusions
This works really well! Now I can use Conditional access when accessing vCenter, for example force MFA with number matching.
I would not have implemented this if I needed to expose my vCenter publicly on the internet. For me that's a really big no no. The on prem SCIM agent is my opinion acceptable. This is only an outbound connection so no public exposure.
If you lock yourself out (happened to me... made a mistake in the attribute mapping and when getting a cup of coffee my vCenter session timed out...) you can still login by appending "/ui/?idp=local" to the vCenter url. This is the "breaking glass" url and you can login for example with your administrator@vsphere.local account.
Chapter 7 The Sources
At first started reading: vSphere 8.0 Update 2: Federated Authentication with Azure Active Directory | VMware.
When reading about the fact EntraID must be able to reach vCenter I started another search, there must be another way. I stumbled upon two links:
An article by Spencer Shiley struggling with the same opinion about exposing vCenter
vCenter 8.0u2 MFA with Entra ID (linkedin.com) This article shows really well the architecture and how this works and gave a big waysign in the right direction but missing some parts. I really suggest reading his article.
next stumbled upon a reddit post: SSO in vCenter and Azure AD without SCIM? : r/vmware (reddit.com). Especially the comment by "dstmar" filled a big gap.
Well, I hope this helps someone configuring this new great feature!
Any questions or remarks? Let me know!
Have a great 2024!


You need to correct where you recommend installing the On-premise ECMA app. It's important that you use the On-premise SCIM app. They look and behave similarly, but you will waste a lot of time trying to use the ECMA app. Thanks for the guide! 😀
After click Finish in the Configure Main Identity Provider (Azure AD) my vCenter try to reach to the Internet (login.microsoftonline.com) which is not as desired (no Internet access for vCenter).